How to Use Replace Color in Photoshop
Photoshop has two tools built for swapping one color for another: the Replace Color command, which changes every matching color at once, and the Color Replacement tool, which paints the new color on. Here is how to use both, which settings matter, and what to do when the result looks wrong.
Quick answer:
- Duplicate the layer with Ctrl+J (Cmd+J on Mac).
- Choose Image → Adjustments → Replace Color.
- Click the color to change, then adjust Fuzziness until only it is white in the preview.
- Move the Hue, Saturation and Lightness sliders, or click the Result swatch, and click OK.
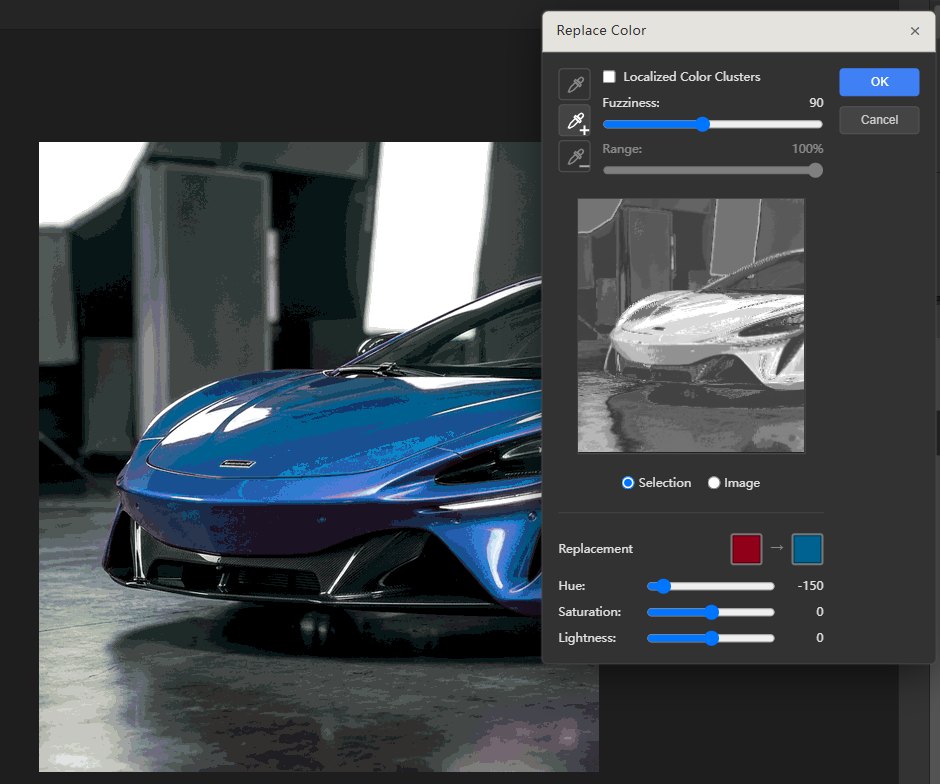
Method 1: Replace Color (Image → Adjustments → Replace Color)
Replace Color selects a color by sampling it, the way Select → Color Range does, and shifts it to a new hue in one step. It is the fastest way to change a car, a shirt or a logo that is mostly one color.
- Duplicate the layer. Replace Color changes the pixels themselves and has no adjustment-layer version, so press Ctrl+J first. If you only want to change part of the image, make a selection now; the command only affects what is selected.
- Open the dialog: Image → Adjustments → Replace Color.
- Sample the color. With the first eyedropper, click the color you want to change, either in the image or in the preview. Shift-click (or use the + eyedropper) to add lighter and darker shades of it; Alt-click (Option-click on Mac, or the − eyedropper) to remove colors you didn't mean to pick.
- Set Fuzziness. Leave the preview on Selection: white areas will change, black areas won't. Raise Fuzziness until the whole object is white, and lower it if the background starts to turn gray. If the same color also appears elsewhere, tick Localized Color Clusters so only areas near your samples are selected.
- Choose the new color. Drag Hue to shift the color around the color wheel, then fine-tune Saturation and Lightness. For an exact brand color, click the Result swatch and pick it in the Color Picker. Click OK.
- Clean up. Add a layer mask to the duplicate and paint black over any area that changed by mistake, such as a reflection or a nearby object of a similar color.
Replace Color Settings at a Glance
| Setting | What it does | Tip |
|---|---|---|
| Eyedroppers (sample, +, −) | Choose which colors are selected | Sample the mid-tone first, then add highlights and shadows with + |
| Fuzziness (0–200) | How far from the sampled colors the selection reaches | 40–100 suits most objects; watch the preview, not the number |
| Localized Color Clusters | Limits the selection to areas near the spots you sampled | Use it when the same color appears elsewhere in the photo |
| Selection / Image preview | Shows the selection mask or the image | Stay on Selection while sampling |
| Hue, Saturation, Lightness | Shift the selected colors | Hue changes the color, Lightness changes how dark it is |
| Result swatch | Sets an exact target color | Best for matching a brand or product color |
Method 2: The Color Replacement Tool (Paint the New Color On)
The Color Replacement tool is a brush that swaps the color under it for your foreground color while keeping the texture and shading. It is better than Replace Color when you only want to recolor a small, specific area, such as eyes, lips or a single stripe.
- Duplicate the layer, then pick the Color Replacement tool. It shares a slot with the Brush tool; press Shift+B to cycle to it.
- Set the foreground color to the new color.
- In the options bar choose Mode: Color, Sampling: Continuous and Limits: Find Edges, and start with a Tolerance of about 30%.
- Paint over the area. Keep the crosshair in the center of the brush on the color you want to replace; it is the color under the crosshair that gets sampled.
| Option | Choices | When to use |
|---|---|---|
| Mode | Hue, Saturation, Color, Luminosity | Color for most recoloring; Hue to keep the original saturation |
| Sampling | Continuous, Once, Background Swatch | Once when the color under the brush varies and you only want the first one |
| Limits | Discontiguous, Contiguous, Find Edges | Find Edges keeps sharp outlines crisp |
| Tolerance | 1–100% | Lower it if the color spills onto neighboring areas |
Replace Color vs Hue/Saturation vs Color Replacement Tool
| Tool | Best for | Editable later? |
|---|---|---|
| Replace Color | Changing every area of one color at once | No; use a duplicate layer |
| Hue/Saturation adjustment layer | Recoloring one color range non-destructively | Yes, with a mask |
| Color Replacement tool | Small, precise areas you paint by hand | No; use a duplicate layer |
For the non-destructive Hue/Saturation method and other ways to recolor an object, see how to change the color of something in Photoshop.
When Replace Color Doesn't Work
- The background changes too. Lower Fuzziness, tick Localized Color Clusters, or select the object before opening Replace Color.
- Highlights or shadows keep the old color. Shift-click those areas to add them to the sample, then raise Fuzziness slightly.
- White, black or gray won't change. These have no hue to shift. Use the Lightness slider, or put a Solid Color fill layer set to the Color or Multiply blend mode over a selection of the object.
- Replace Color is grayed out. It only works on pixel layers. Rasterize a copy of a text, shape or Smart Object layer, and if the document is in Indexed Color or Bitmap mode, convert it with Image → Mode → RGB Color.
- The new color looks flat. Push Saturation less and adjust Lightness instead; strong saturation shifts can wipe out the original shading.
How to Replace a Color for Free, Without Photoshop
PhotoQuill is a free Photoshop-style editor that runs in your browser, and it has the same Image → Adjustments → Replace Color dialog: the three eyedroppers, Localized Color Clusters, Fuzziness, the Selection and Image previews, and Hue, Saturation and Lightness. It also has a Color Replacement tool. Open your photo or PSD, follow the steps above, and save the result as a PSD, PNG or JPG. There is nothing to install and no account needed. The screenshot at the top of this page was made in PhotoQuill.
Replace a Color in Your Browser
Open PhotoQuill, drop in your image and choose Image → Adjustments → Replace Color. Free, with no download or sign-up.
Open PhotoQuill FreeFrequently Asked Questions
Choose Image → Adjustments → Replace Color, click the color you want to change, adjust Fuzziness until only that color is selected, then set the new color with the Hue, Saturation and Lightness sliders or the Result swatch and click OK. Work on a duplicate layer, because the change is applied directly to the pixels.
It is under Image → Adjustments → Replace Color. It is not in the Adjustments panel and cannot be added as an adjustment layer.
No. Replace Color changes the pixels of the active layer. For an editable result, use a Hue/Saturation adjustment layer limited to one color range with a mask, or apply Replace Color to a duplicate layer so you can mask or delete it later.
It only works on pixel layers, and not in Indexed Color or Bitmap documents. Rasterize a copy of a text, shape or Smart Object layer, or convert the document with Image → Mode → RGB Color.
PhotoQuill is a free editor that runs in your browser and has the same Image → Adjustments → Replace Color dialog, with eyedroppers, Localized Color Clusters, Fuzziness and Hue, Saturation and Lightness, plus a Color Replacement tool. It needs no download or account.