How to Crop a Photo: Master Aspect Ratios and Visual Composition
Cropping is the single most transformative tool in digital photography and graphic design. With a few deliberate adjustments, cropping eliminates distracting background clutter, rebalances off-center subjects, straightens crooked horizons, and recalibrates images to fit exact social media and print specifications. Learning how to crop a photo empowers you to turn an ordinary snapshot into an eye-catching, professionally composed visual piece.
The Art and Mathematics of Photo Cropping
Cropping is far more than simply cutting off borders. In visual arts, cropping establishes visual hierarchy and guides where the viewer's eye travels across the canvas. A wide environmental landscape shot can be cropped into an intimate, emotive portrait simply by tightening the boundaries around the subject's face.
A successful crop also resolves camera alignment errors. If a photo was taken at a slight angle, rotating and cropping in one continuous step aligns horizontal references (such as ocean skylines or building facades) with the edge of the frame, instantly imparting professional polish.
Finally, cropping adapts imagery across modern responsive viewports. A panoramic 16:9 banner that looks magnificent on desktop monitors must be cropped to a 4:5 vertical portrait or 1:1 square to capture attention in mobile feeds without being cut off awkwardly.
| Standard Aspect Ratio | Pixel Dimensions | Primary Visual Use Case |
|---|---|---|
| 1:1 (Square) | 1080 x 1080 px | Classic social media profile avatars, e-commerce product grids |
| 4:5 (Vertical Portrait) | 1080 x 1350 px | Mobile social feeds (maximizes vertical screen real estate) |
| 16:9 (Widescreen Landscape) | 1920 x 1080 px | YouTube video thumbnails, presentation decks, website hero banners |
| 9:16 (Vertical Fullscreen) | 1080 x 1920 px | TikTok videos, Instagram Stories & Reels, smartphone lock screens |
| 3:2 (Classic 35mm Film) | 3000 x 2000 px | Standard DSLR raw photography & 4x6 inch photographic prints |
Method 1: Cropping Online with PhotoQuill (Rule of Thirds Overlay)
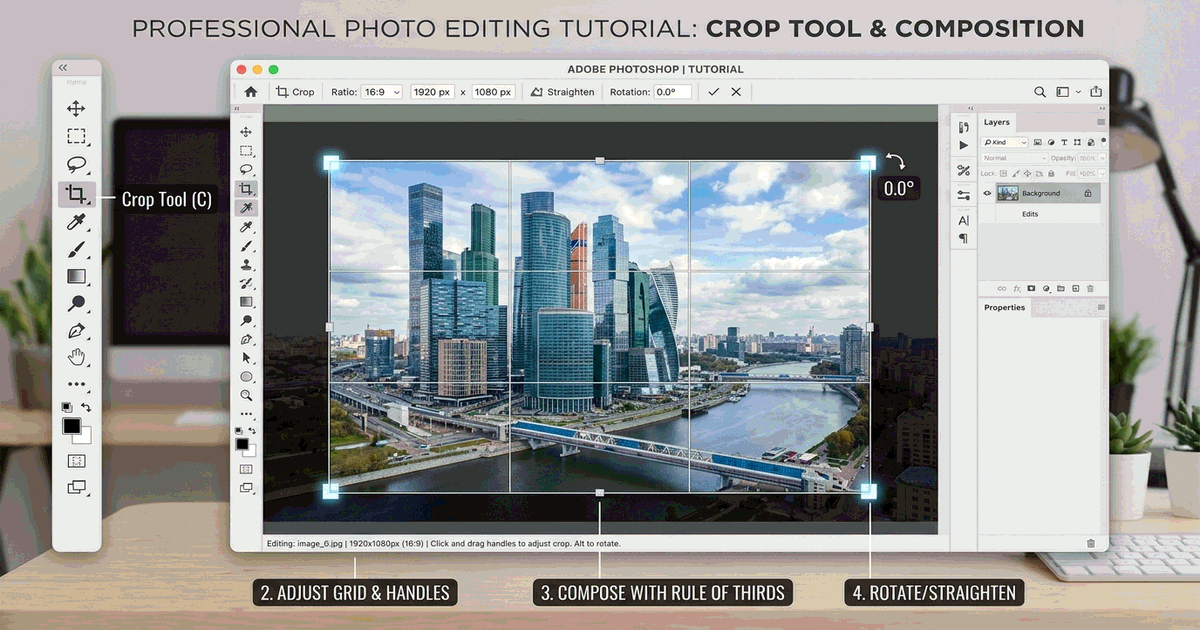
PhotoQuill provides a professional-grade crop tool directly in your browser with interactive overlays, predefined aspect ratio locks, and non-destructive editing:
- Navigate to the PhotoQuill Web App and drop your image onto the canvas.
- Press the shortcut key C or click the Crop Tool icon on the left toolbar.
- In the top options bar, click the Ratio dropdown to lock standard proportions (such as 1:1, 4:5, or 16:9), or leave it set to Free for custom framing.
- Click and drag the corner handles to adjust the crop box. A 3x3 grid overlay appears automatically. Position your primary subject along the grid lines or at their intersections.
- To straighten a crooked horizon, move your cursor slightly outside any corner handle until the rotation arrow appears, then rotate the canvas until level.
- Press Enter or click the checkmark to apply the crop. Export your image via File → Export As → JPG.
3 Classic Composition Rules to Apply When Cropping
Transform your crops by applying these foundational photography principles:
1. The Rule of Thirds
Divide your composition into nine equal quadrants using two vertical and two horizontal lines. Placing key elements—such as a subject's eyes, the horizon line, or a prominent architectural spire—directly on these lines or intersection nodes creates natural balance and tension, far superior to placing everything in the dead center.
2. Lead Room and Direction of Gaze
When cropping portraits of people or wildlife, always leave extra negative space in the direction the subject is looking or moving. If a runner is moving toward the right side of the frame, leave ample open space on the right. Cropping too tightly in front of a subject's face creates a claustrophobic, trapped sensation.
3. Eliminating Perimeter Distractions
Scan the outer edges of your framing box before committing. Bright exit signs, partially cut-off strangers, stray electrical poles, or trash cans sitting along the edge of the frame draw the viewer's eye away from your main subject. Crop inwards by 5% to eliminate distracting edge clutter cleanly.
Preventing Over-Cropping and Pixelation
Every time you crop an image, you permanently discard outer pixels, reducing the overall resolution of the remaining area. If you crop a tiny 500-pixel section out of a 24-megapixel photo and attempt to print it as a large poster, the result will be blurry and pixelated.
As a general rule, ensure your final cropped image retains at least 1920 pixels on its longest edge for crisp desktop display, or 3000 pixels if you intend to print a standard 8x10 inch physical photograph. To reduce overall file size without sacrificing pixels, combine cropping with our guide on how to reduce JPG file size efficiently.