How to Change DPI in Photoshop
Preparing images for print requires setting the right DPI resolution metadata. Learn how to switch to 300 DPI for commercial printing without resizing or degrading original pixel data.
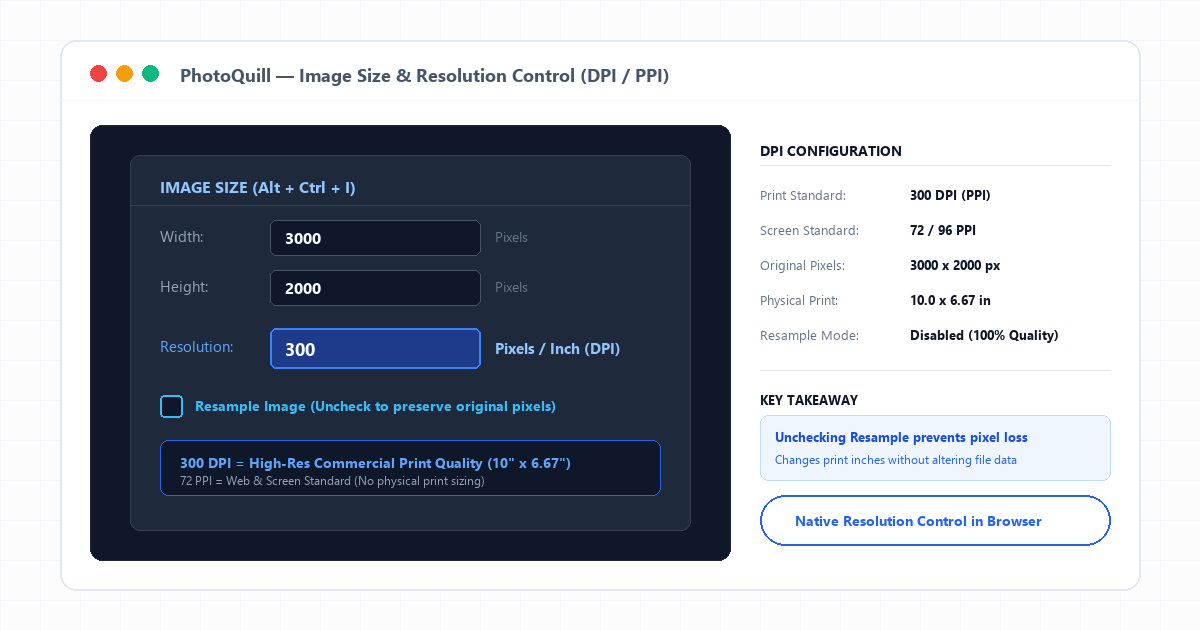
The Difference Between DPI and PPI
While commonly used interchangeably, DPI (Dots Per Inch) and PPI (Pixels Per Inch) govern different stages of the imaging pipeline. PPI describes digital image resolution on screens and camera sensors, defining how many color pixels fit inside an inch of digital canvas. DPI describes the microscopic droplets of cyan, magenta, yellow, and black ink sprayed onto paper by physical printers.
Inside Photoshop and PhotoQuill, the resolution field is officially measured in PPI. When a commercial print shop requests "300 DPI files," they mean your file metadata should declare 300 PPI so their RIP (Raster Image Processor) maps your digital pixels into physical printer dots cleanly.
Digital screens ignore DPI metadata entirely. A 3000×2000 pixel photograph displays at identical dimensions on a monitor whether marked as 72 PPI or 300 PPI. DPI only exerts physical influence when sending pixels to a printing device. To explore altering the total pixel dimensions instead, consult our image resizing guide.
The Resample Checkbox: How to Change DPI Without Pixel Loss
The biggest pitfall when changing resolution is leaving the Resample checkbox enabled. When Resample is checked, altering the resolution from 72 to 300 forces the software to create millions of artificial interpolated pixels, bloating file size and degrading sharpness.
Unchecking Resample: The Golden Rule
When you uncheck Resample in the Image Size dialog:
- The total pixel count (e.g. 3000 × 2000 px) remains completely untouched.
- The file size in megabytes on your hard drive does not change by a single byte.
- Width and height in physical units (inches or centimeters) scale inversely with resolution. Higher DPI compresses pixels into a smaller, sharper physical print.
Review the standard resolution recommendations across various commercial print mediums:
| Print Application | Target Resolution | Viewing Distance | Visual Standard |
|---|---|---|---|
| Art Books & Magazines | 300 PPI | 10 – 14 inches (arm's length) | Ultra-sharp continuous tone |
| Desktop Photo Prints (4x6, 8x10) | 240 – 300 PPI | 12 – 18 inches | Photo studio quality |
| Exhibition Gallery Posters | 150 – 200 PPI | 3 – 6 feet | Smooth visual impression |
| Outdoor Vinyl Billboards | 50 – 100 PPI | 15+ feet | Optimized for long-range observation |
If your physical print dimensions require extra margins or border space without altering resolution density, see our guide on adjusting canvas size.
Calculating Real-World Print Dimensions
Calculating how large your photograph can print at 300 DPI uses straightforward math: divide total horizontal and vertical pixel counts by 300.
For example, if your camera produces a 6000 × 4000 pixel RAW image file:
- 6000 pixels / 300 DPI = 20 inches wide
- 4000 pixels / 300 DPI = 13.3 inches tall
Step-by-Step: How to Change DPI in PhotoQuill
Open Your Image
Navigate to PhotoQuill in your web browser. Press Ctrl+O to open your image file into the editor workspace.
Launch the Image Size Dialog
Click Image in the top menu bar, then click Image Size.... You can also press the universal hotkey Alt+Ctrl+I (Option+Cmd+I on Mac).
Uncheck Resample
Before typing any numbers, ensure the Resample checkbox is unchecked. This locks your existing pixel matrix and ensures non-destructive metadata updates.
Type 300 into the Resolution Field
Highlight the existing number in the Resolution box (often 72) and replace it with 300. Verify the adjacent dropdown is set to Pixels / Inch.
Confirm and Save Your Document
Click OK to commit the resolution tag. Go to File > Save as PSD or File > Export JPG (quality 100) to deliver your 300 DPI asset to your printer.